Domain Discovery
This guide should explain how domain discovery works and how to configure it in ZITADEL.
Overview
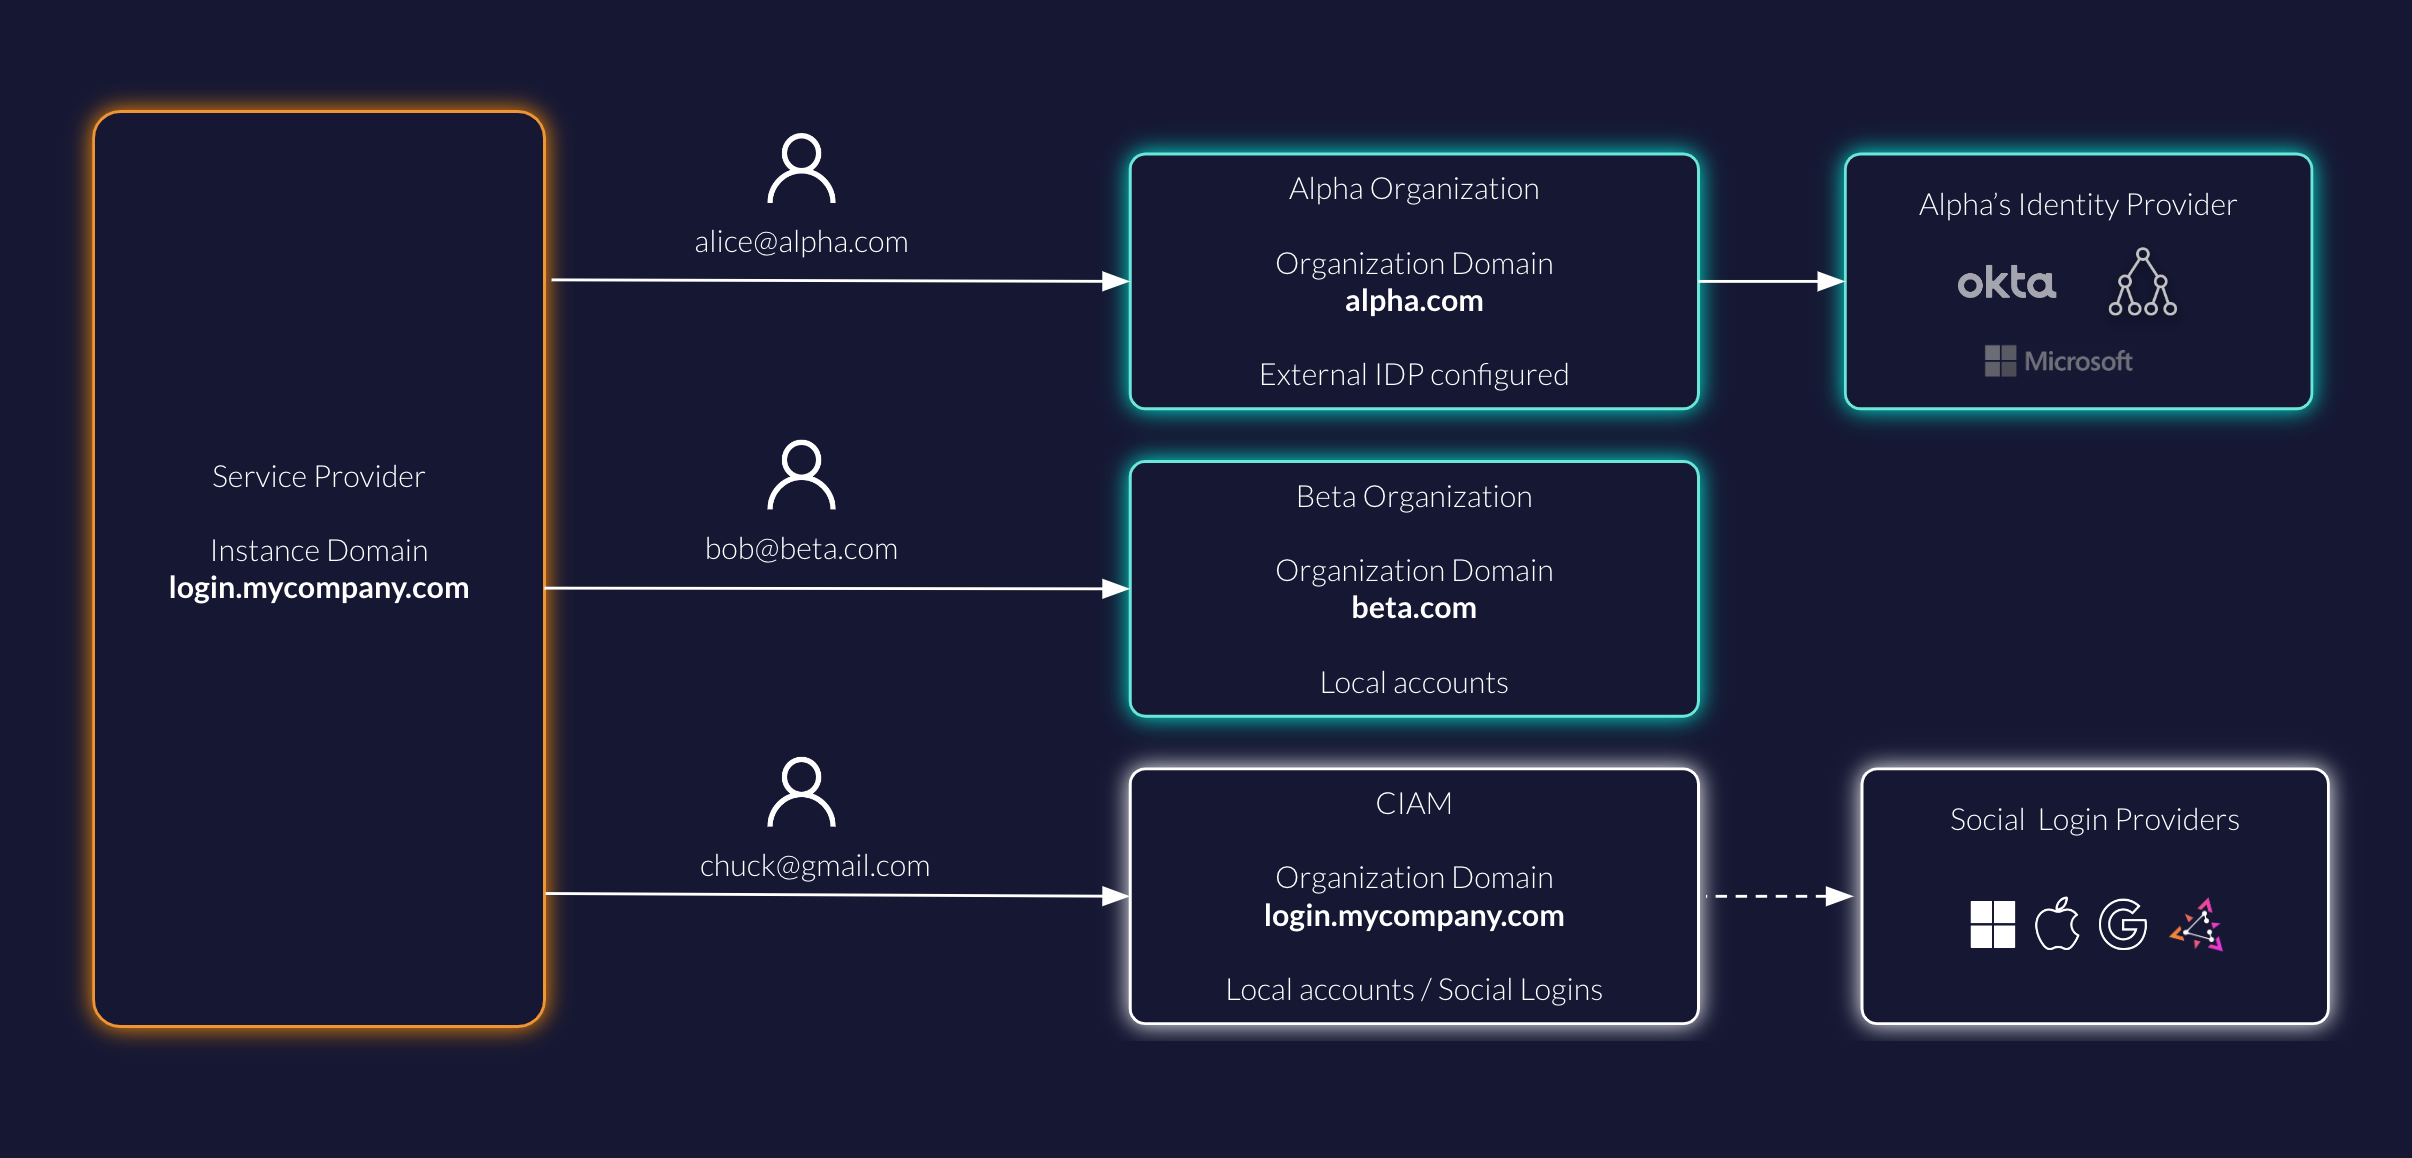
Domain discovery is typically used in B2B or SaaS scenarios where you have users from different organizations and you want to route them according to their login methods, which could be a user name or, depending on your configuration, also an email / phone number.

In the example there is a service provider with a ZITADEL instance running on a custom domain on login.mycompany.com.
By default all users login on the organization CIAM with their preferred social login provider.
Users of the two business customers Alpha and Beta should login according to their organization login and access policy settings. In case of Alpha users will login via an external identity provider (eg, AzureAD). Beta users must only login with username/password and MFA instead.
For this scenario you need to route the user alice@alpha.com to the Alpha Organization and bob@beta.com to the Beta Organization respectively.
Follow this guide to configure your ZITADEL instance for this scenario.
Instance
Default Login Page
You will use the instance default settings for the login for the organization CIAM.
When opening login.mycompany.com then the login policy of the instance will be applied.
This means that you have to configure the Login and Access Policy and Identity Providers for the CIAM users on the instance itself.
You can also configure these settings on the default organization (see below) and send the scope urn:zitadel:iam:org:id:{id} with every auth request.
Default Organization
Set CIAM as default organization. You will find the overview of all organizations under the "Organizations" tab on the Instance Settings.
The default organization will hold all unmatched users, ie. all users that are not specifically in the organizations Alpha or Beta in the example.
Enable Domain Discovery
In the Login Behavior and Security Settings enable "Domain discovery allowed"
Configure login with email
Follow this configuration guide to allow users to login with their email address.
Other considerations
You can also have multiple custom domains pointing to the same instance as described in this configuration guide. In our example you could also use alpha.mycompany.com to show the login page of your instance.
The domain of your email notification can be changed by setting up your SMTP.
Organization
Alpha organization
Users of Alpha should only be allowed to authenticate with their company's identity provider.
In the organization settings under Login Behavior and Access make sure the following settings are applied:
- Username Password allowed: Disabled
- Register allowed: Disabled - we will configure this on the external identity provider
- External IDP allowed: Enabled
Now you can configure an external identity provider.
Given you have only one external identity provider configured, when a user tries to login on that organization, then the user will be automatically redirected to the external identity provider.
In case multiple providers are configured, then the user will be prompted to select an identity provider.
Beta organization
Users of Beta must create an account and login with password and 2FA.
In the organization settings under Login Behavior and Access make sure the following settings are applied:
- Username Password allowed: Enabled
- Register allowed: Disabled - you may want Managers to setup accounts.
- External IDP allowed: Disabled
Make sure to Force MFA so that users must setup a second factor for authentication.
Verify domains
Switch to the organization Alpha and select the tab "Domains". Verify the domain alpha.com following the organization guide.
Do the same for the Beta organization.
You can also disable domain verification with acme challenge in the instance settings.
Conclusion
You should be all setup to try out domain discovery.
The user journeys for the different users would look as follows:
- User (Alice, Bob, Chuck) clicks a login button in your application
- Redirected to
login.mycompany.com(ZITADEL running under a custom domain)
Chuck
- Select Google button
- Redirect to Google IDP
- Chuck logs in with Google credentials
- Redirected back to your application
Alice
- Alice enters alice@alpha.com and clicks next
- Redirect to AzureAD Tenant (or any other IDP)
- Alice logs in with her company credentials
- Redirected back to your application
Bob
- Bob enters bob@beta.com and clicks next
- Bob will be redirected to a login with the branding of beta.com
- Bob enters his password and MFA on the login screen
- Redirected back to your application